Tenant management
With cloud deployments of Reporting and multitenancy, the option of having multiple different and separate tenants within the same system becomes available. Individual users are registered for a specific tenant, and they have access only to that tenant, as well as only the data that is part of the tenant that is shared with them.
Multitenancy in Reporting
The multitenancy option in Reporting allows you to have multiple independent instances, or tenants, of Reporting operating in a shared environment. A tenant is a group of users who share a common access to other users and data, while also having a defined set of privileges and rules that apply to all users in that tenant.
Tenants are isolated from one another, which means that you can have multiple large groups of users (such as for departments, company branches, or even multiple companies; depending on your use case) functioning within the same instance of Reporting without having any direct contact between users or data from different tenants. A user of one tenant can only see users and data connected to their tenant, without contact with any other users or data in your Reporting instance.
An example of how this is applied is when a Report Designer wants to share a report with other users - they can only see the users that are part of their tenant, and they can only share the report with them, not other users in the system.
In practical terms, this means that you as a System Administrator can control all the tenants within the same system. You can set the basic shared parameters for all tenants, but Administrators can modify them on the level of an individual tenant. From a user perspective, this means all users within a single tenant can interact with each other, the data or reports the same way they would if the system were used in single-tenant mode. However, they cannot share data or dashboards, or interact with users from other tenants.
Tenants
To access the menu for Tenant Management, click the Admin tab in the top part of the screen, and then click Tenants in the Tenant management group of the Administrator pane on the left side of the window.
|
Note While the rest of the functionalities in the Admin tab is the same as with Administrator users, System Administrators have additional access to the Tenant Management section of the Admin tab, where they can create and manage tenants. |
An overview of the basic information related to available tenants is provided here. System Administrators can see existing tenants, edit them, search through them, or create new ones.
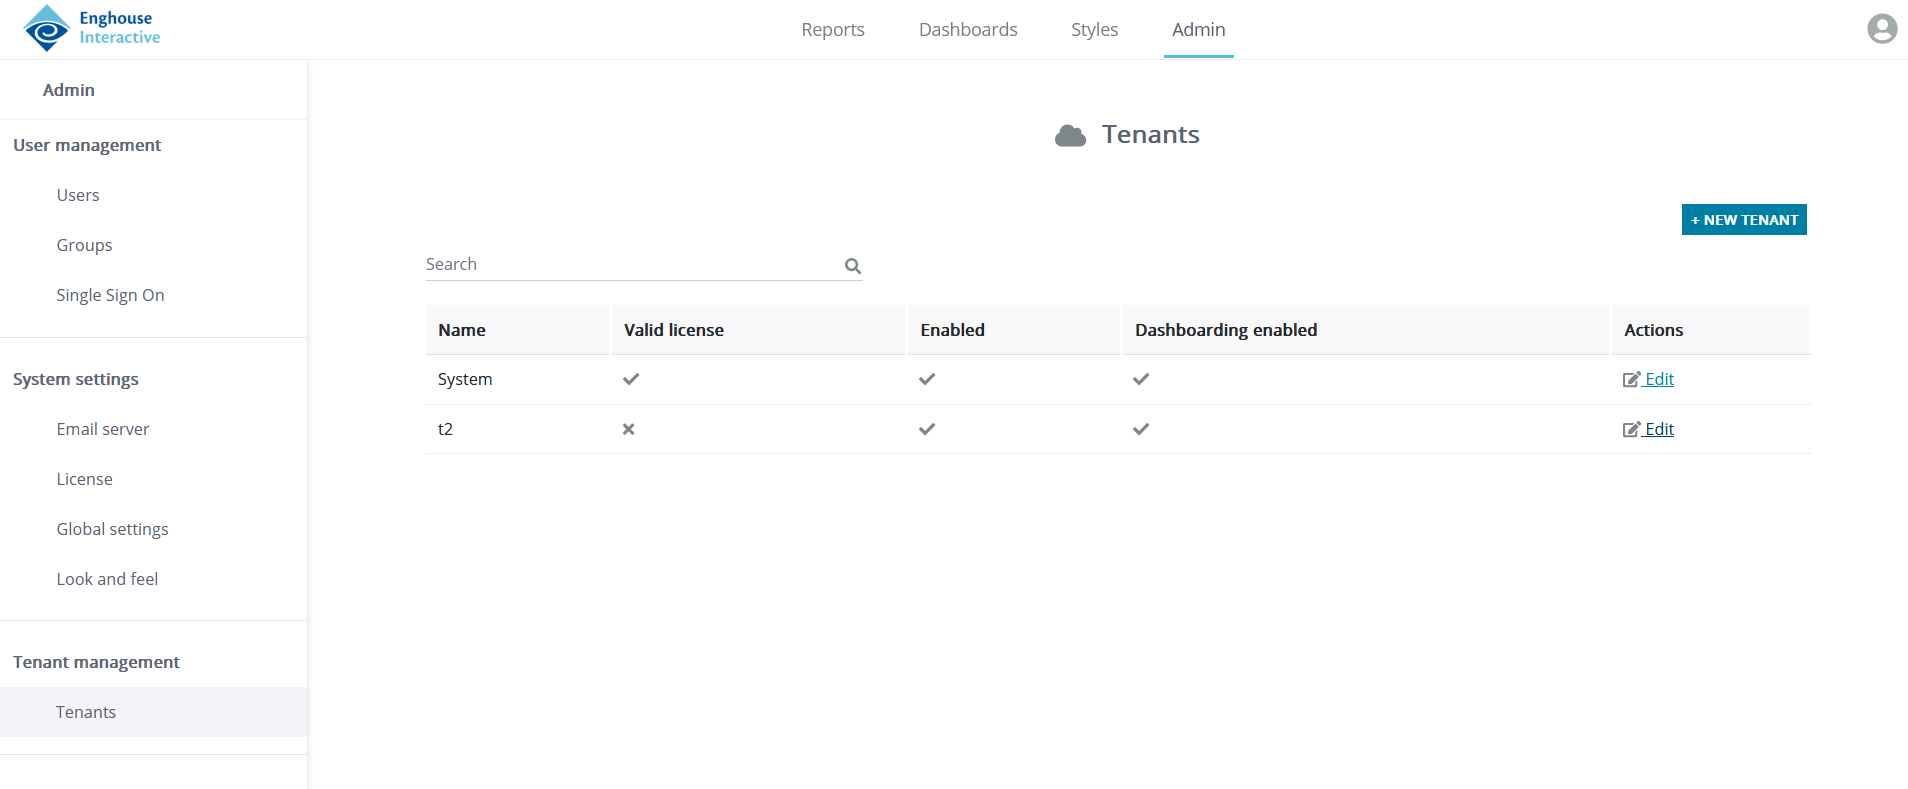
The existing tenants in your instance of Reporting are listed in a table format. The following columns are shown:
- Name: The assigned name of the tenant.
- Valid license: Flag indicating whether a license is still valid. The license is still valid if the expiration date has not passed.
|
Note Tenants without a license cannot be used by Viewers and other users. Administrators need to license a tenant to start using it. With mulit-tenant licenses, the System Administrator must allocate licenses to the tenant. |
- Enabled: Flag indicating whether a tenant is enabled or not. A disabled tenant cannot be used by any users until enabled again by the System Administrator.
- Dashboarding enabled: Flag indicating whether or not the dashboarding feature is enabled for the tenant.
- Actions: Click Edit to modify a tenant's settings. See more in Editing a tenant.
Creating a new tenant
To create a new tenant in your Reporting instance, follow these steps:
- Select New Tenant in the upper right corner of the window. This opens a dialogue window, Tenant details.
- Enter the following information:
- Tenant Name: The name you want to assign to the new tenant.
- Dashboarding enabled: Select the checkbox to enable Dashboarding.
- Number of days to warn the user before license expires: Select how many days prior to your license expiring you would like to be reminded that your license is about to expire.
|
Note If you choose 0, you will not be reminded of your license expiring. |
- First day of the week: Starting day of the week for calendar-related reports and visualizations. In the dropdown menu, you can choose between Sunday and Monday.
- Hosts: Enter one or more of the tenant's host addresses.
- Database connections: Start filling out the Connection string box to make additional options appear.
- Name: The name you want to assign to the database connection.
|
Note If you want to use Standard Reports, you need to create a database connection called DWH (using capital letters). |
- Database type: From the dropdown list, choose the type of the tenant's database. The currently available options are Oracle, Microsoft SQL Server, PostgreSQL, and MySQL.
- Connection string: The connection string to the standard DWH that contains call center data for the new tenant. It is the connection string that will be assigned to standard reports when the tenant users use them. The connecting string format is typically like the following: Server=<serverIpOrName>; User Id=<dbUser>; Database=<databaseName>; Password=<userPassword>.
|
Note To add a database connection, click the Add connection button. If you wish to add more than one connection, repeat the above-mentioned process. The connection string is checked when set for a tenant; if the connection is invalid, an error is shown to indicate what the issue is. |
- Tenant administrator information: Enter the information that will be used to create the first Administrator user for the new tenant, which is then in charge of further actions related to the tenant, such as licensing it, creating other users, sharing reports and data sources, etc.
|
Note You must personally (or through other secure channels) notify the new Administrator user of the username and password you set for them so they can log in for the first time. It is recommended that the new user change their password after the first login. |
- Click Save to finish. Your new tenant is now created and can be seen in the Tenants section of the Admin tab, and is enabled by default.
Editing a tenant
To edit a tenant, click Edit in the Actions column of that tenant. The options available there reflect the information entered when adding a new tenant, as described in Creating a new tenant, along with two more checkboxes:
- Enabled: You can clear this checkbox to disable the tenant, which stops all users from accessing it; correspondingly, you can select it to once again enable the tenant, allowing the tenant users to access it.
|
Note When editing multi-tenant licenses, disabling a tenant removes all allocated licenses from that tenant. Enabling the tenant again does not restore the previously allocated licenses. |
- Dashboarding enabled: Select this checkbox to enable the Dashboarding feature of BI Reporting. Conversely, clear this checkbox to prevent the users of this tenant to access the Dashboarding feature in any way.
