Data model sharing
The data model sharing option lets the owner of the data model grant access to other users or groups in Reporting.
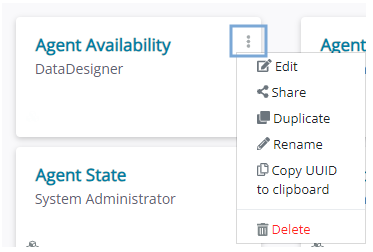
It is located in the options menu for all owned data models in the data models list. To share a data model with other users, do the following:
-
Click Options
 of an owned data model, then click Share in the dropdown menu.
- In the Search user or group search box, enter the group name or individual user name or email address. If the asset is already shared with users or groups, you will see the list below the search bar.
- Click the user or group you want to share the data model with.
- Select one of the following sharing options from the dropdown list:
- Can query: The user or group gains permission to view or create reports that access any data included in the data model, but cannot access or change the parameters of the model or the data itself. Available for all user roles. Data Designers can also duplicate a data model (and become the copy's owner) if they are shared an asset with the Can Query access level.
- Can edit: The user or group can use and duplicate the data model and/or change the model parameters, but not share it with other users. Available only for Data Designers. This applies to users or a group a data model was shared with; if there are, e.g., Viewers in such a group, they will not be able to edit the data model, as this action goes beyond their role access level.
- Make owner: Ownership of the data model is transferred to the user. Current owner loses all access rights to the data model. Available for Data Designers and Administrators. The owner can share the asset with other users.
|
Caution Transferring ownership cannot be undone by the original owner. It can be reversed only by the new owner or the tenant Administrator or System Administrator. |
Existing sharing settings for each user or group can be modified (dropdown list) or deleted ( ).
).
Bulk asset sharing
If you use the tabular view  , you can share and unshare the assets in bulk. To do so, follow these steps:
- Select one or more assets in the table.
- Click Share or Unshare.
- Search for the user(s) or group you want to share or unshare the asset for.
- For sharing, choose the access level you want to grant to the user(s) or group. The same rules apply as described in the section above. For unsharing, click next to the user(s) or group you want to remove access from.
- When done with the changes, click Share or Unshare to shave your changes.
|
Note
|
 in the top part of the pop-up window to see which assets you are working with if multiple are selected.