Filters & Settings
The Parameters pane, which contains the filters and settings, is located on the right-hand side of the report window. If the Designer sets up the report so that it has filtering options and other settings you can modify, reports can be filtered by Viewers.
When both filters and settings are available for a report, the filters and settings are divided into two tabs for a more efficient viewing experience:
The Parameters pane can be minimized or expanded by clicking the Filtering icon. The icon is gray and white  if the pane is expanded, or white and blue
  if the pane is collapsed.
All the parameters that can be used by the Viewer to filter and modify data presented in the report are listed in the Parameters pane. The types of parameters can vary and their values are entered by the Viewer. If a report has required (*) filters and/or settings, the report and its data are not rendered unless relevant values are used for those parameters. Only after the values are set up is the report rendered and data displayed.
|
Note If no Viewer-input requirements in form of filtering values and settings exist for a report, the report is rendered directly once it is opened from the available reports list. |
|
Note It is possible to add custom checks (validations) for filter values a user can enter to ensure they meet business rules before a report runs. To learn how a data designer can define and validate the content a user introduces in the filters and settings, see |
Filters and settings are shown as empty until one or multiple values (depending on the type of parameter) are selected or entered.
Additionally, when you open a dropdown list, you can use the search function to find the data that you need, or you can click Select all / clear all to facilitate your selection. Furthermore, when one value is selected, it is shown in the parameter field against a blue background, while if multiple values are selected, the total number of selected values for that parameter is shown:
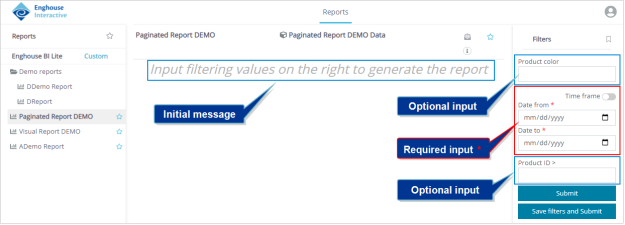
When a report that has required filters and/or settings is selected from the available reports list, an initial message is shown in the report area to note that relevant parameters need to be entered to generate the report. The rest of the Reports window is blank, as the report itself has not been rendered yet.
Finally, when sharing your report with others, you may want to include relevant information about the filters and settings you used in the report. In order to do so, select Show filters and settings sumup in the Settings tab. When this checkbox is selected, your report, once generated, will include a footer section that shows all the used parameters.
Report data filtering example
In this example, the report is opened and the initial message related to filtering is displayed. Several input fields for filtering values are available:
-
The first is related to the Product color category, which is a product color column in the data source. The data displayed in the report is filtered according to the value entered in this field. Since this field is not marked as required (with a * symbol), it can be left empty (NULL).
|
Note You still need to click the Submit button to render the report, even if all the filters are optional and you do not need to enter them. |
- The next two fields provided for filtering are on a date-range basis. The two values are required (marked with *). For the report to render, Date from and Date to must be entered and the displayed report will correspond to this date range. The report Designer can provide suggested default values, or leave them up to the Viewer.
- The remaining filtering field Product ID >, connected to this column in the data source, is also optional. It is used to display items with a product ID number larger than the one entered in the field (as signified by ">" in the field title).
If Submit is clicked with an empty required field value (Date fields in this example), the following warning is displayed: The required filtering fields are: Date. Only when a valid value is submitted is the report data filtered and the report page is rendered (data is displayed).
In case the filtering input field value is valid (non NULL), but it is not present in the database, the rendered report will be displayed as empty since there is no related data available for these filter settings. This may happen, for example, if the date range is set outside the dates available in the data source. In the following image, the date range is set to a range for which the data source has no data.
![]()
In the following example, the Product color and Product ID > filter fields are left empty, but a valid date range is entered. After clicking Submit, the date filtering limits the displayed data to records that have the sales start date inside the defined range. You can compare the rendered report (below) with the one presented in Interacting with reports, and see that it changed in accordance with the reduced date range.
![]()
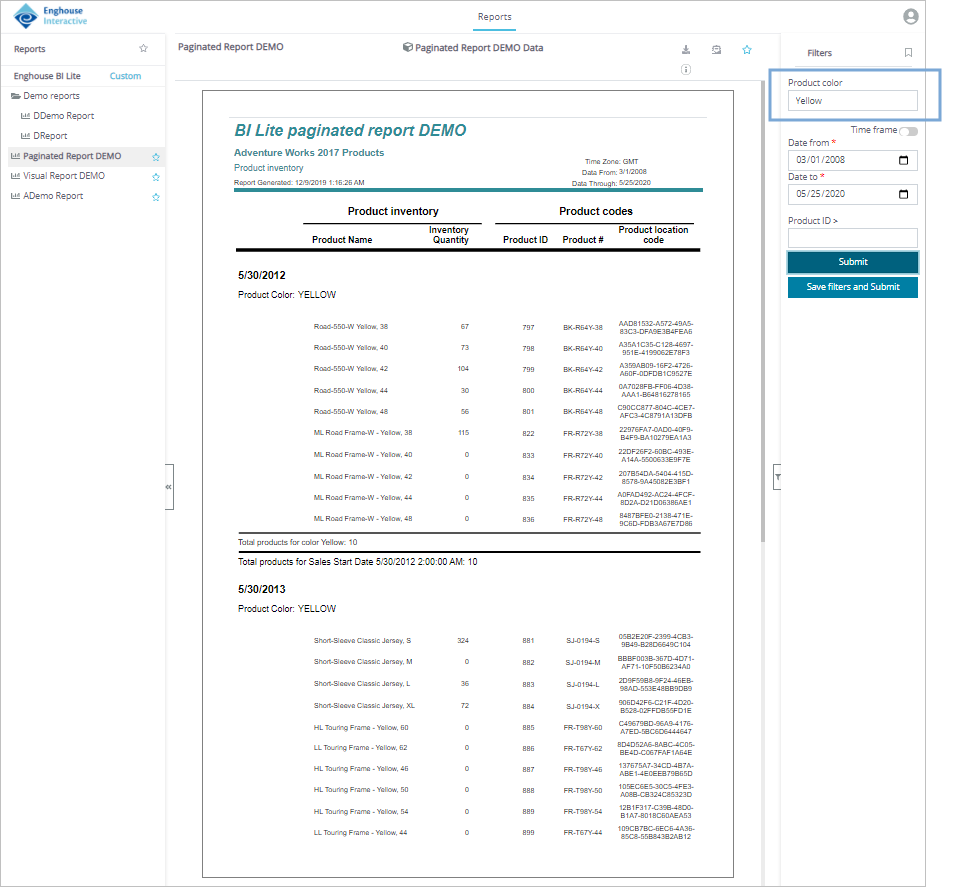
In the next filtering example, the displayed data is filtered so that it shows only products that have the filtering Product color column value set to Yellow. The displayed records are different compared to the report presented in Interacting with reports, as well. In this example, the selected date range also encompasses the full database contents. The report now includes only products with the Yellow product color, filtering out the rest.
Time frame
The datetime values can be defined either as absolutes or as relatives. Absolute values are explicit datetime values like the ones that were used in the previous examples. The Time frame toggle for the datetime filtering option provides an alternative to absolute values for date and time.
When the Time frame toggle is switched on in the Parameters pane, the relative datetime input becomes available. This allows you to set a time frame relative to your current date and time. Units of time you can select are Days, Weeks, Months, Quarters or Years. Each of these units has a selection of possible related amounts of time. To complete the selection, both the unit and the corresponding amount need to be selected.
For example, if you click the Months category, possible additional options include This Month, Last 2 Months, etc.
The first of the following three images represents the absolute datetime selection, with specific dates entered as the start and end points. The second and third image show a relative time frame unit and amount selection, respectively.
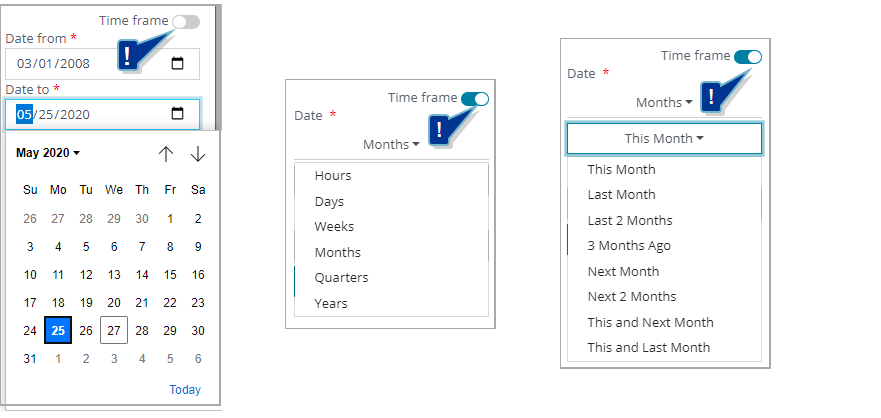
The Time frame option allows you to select a time range independent of the absolute option, which are specific individual dates. For example, this can be useful if you want a report to only show data relevant for this quarter. If you use the Time frame option, you do not have to change the specific dates periodically, as the system will automatically show you a report with data for e.g. your current quarter, regardless of the individual date.
Filtering data types
Depending on the report design, filters can be of different data types. The most common ones are Numerical, String, Datetime and Boolean (logical True/False). Filters (and settings) can also be shown in various forms, such as multi-select or single-select dropdown lists, entry fields, calendar selections, checkboxes, etc.
In the following example, another filtering value was added to the previously used report. Now it includes three different filtering categories at the same time.
Along with the previously presented Product color (String) and Date (Datetime) filters, a new Product ID > (Numerical) data type filter is added. It allows the Viewer to select only records for which the Product ID category has a value larger than the one that is input.
Leaving the Product color category empty does not filter the records by color, but shows all products with all colors.
In the example below, products that started selling after 03/01/2008 and with a Product ID higher than 950 are shown.
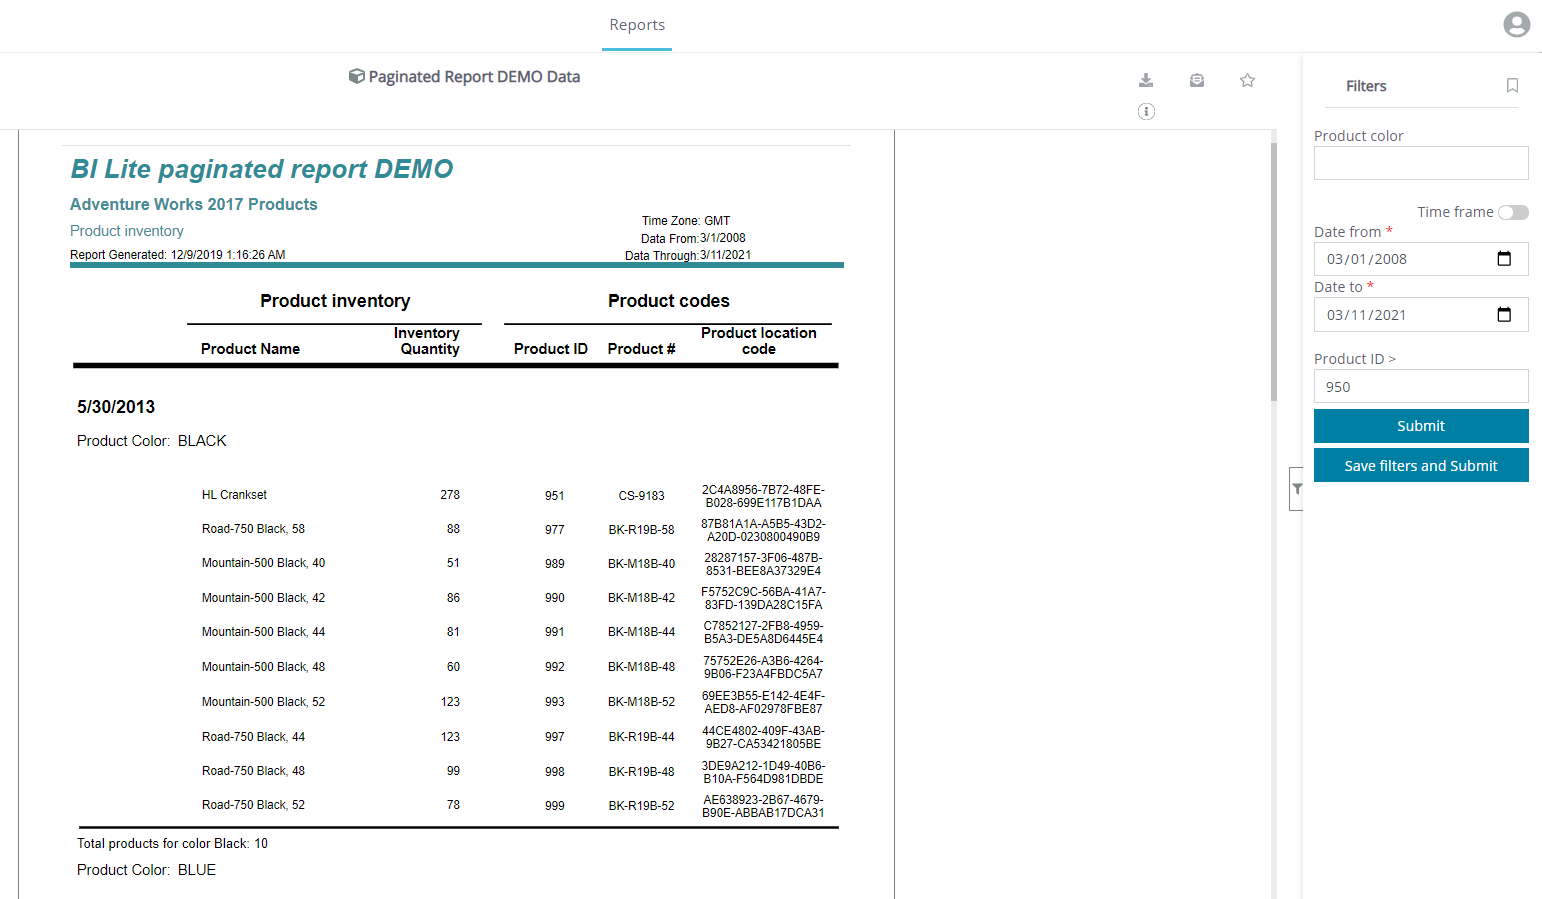
In the next example, the values for Product ID and Sell Start Date are retained. However, Silver is also added as the Product color. After clicking Submit, the contents of the page change to display products that correspond to the added of filtering values.

Dependent filters
Based on the design of the data source, the asset you are viewing may feature dependent filters. These are filters that are in a hierarchical relationship where the selections of one filter influence which options are available in one or more others.
Dependent filters are not indicated in the Parameters pane in any way, but if the conditions of a filter that has one or more other filters dependent on it are changed, a reload of all filters occurs to adjust to the changes as needed.
|
Caution Typically, dependent filters are only dropdown single and multi-selection list filters. If other types of filters, such as user-input filters, are set up as dependent filters, they may not function properly. |
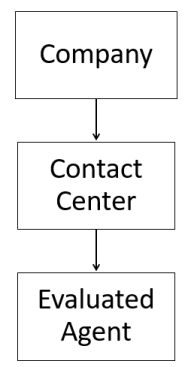
Additionally, one filter may have multiple dependent filters, or they may be organized in a multi-level hierarchy, where every filter influences all the filters below it.
| Simple dependent filter | Multiple dependent filters on same filter | Hierarchy of dependent filters |
|---|---|---|
|
|
|
|
Example
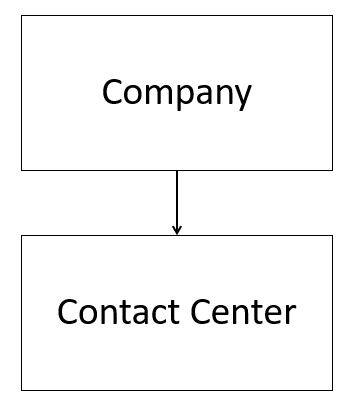
Below is a snippet of the filters available in the Survey Answers Detail standard report:
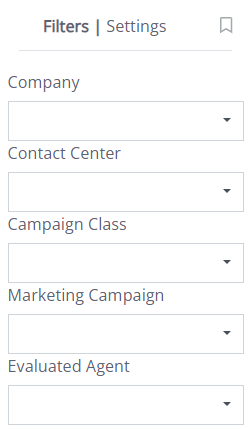
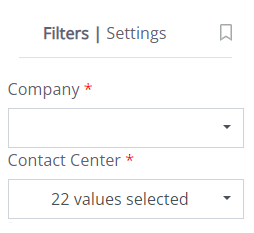
In this report, the Contact Center filter is dependent on the Company filter. This means that when one or multiple company filter values are selected in the dropdown list, this triggers the dependency so that only Contact Center values that are related to the selected companies are shown.
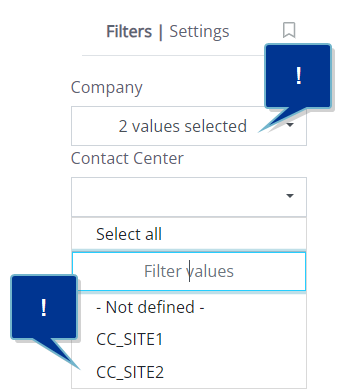
When no specific Company values are selected, all Contact Center values available to the user in the data source are shown:

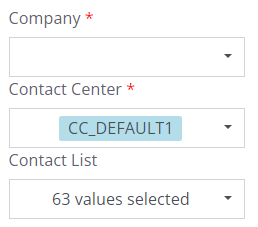
However, when some Company values are selected, such as "Company A" and "Company B", a quick refresh is triggered, and now only those Contact Center values that are related to the selected companies are shown (and can be used in the report):
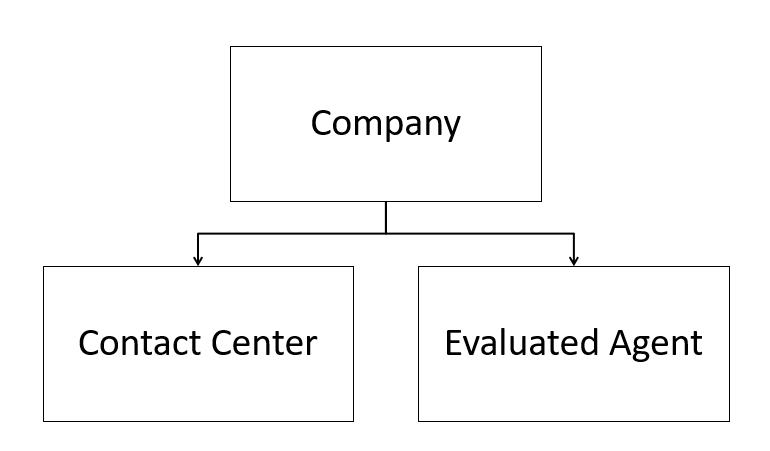
Following the same logic, another filter in this report could be dependent, such as the Evaluated Agent filter. For example, it could also be dependent either on the Company filter (so only agents related to the selected companies are shown in the filter dropdown list), or on the Contact Center filter (so only agents in the selected contact centers are shown), which, in turn, is dependent on the Company filter.
As mentioned previously, multiple filters can be dependent on the same filter, such as both Contact Center and Evaluated Agent depending on the Company filter, without any relation to each other, or there can be multiple levels of dependent filters in a sort of hierarchy, where every level of the filters influences all those below it in the hierarchy, such as Company > Contact Center > Evaluated Agent, as described in this example.
Saving filters
Any set of entered filtering values can be saved for future use as the default set. This means that the saved values are automatically loaded with the report. To do this, click Save and Submit, located below the Submit button in the Parameters pane.
When a set of filter values is saved, the Restore default filters button appears, which provides the option of deleting the saved set of filtering values and reverting to the original default ones, allowing you to enter new values.
Additionally, when you save and submit your filters and settings, an additional Auto Submit option is shown. If you select this checkmark, your report will automatically generate every time you open it, using the saved filters and settings.
Filter Bookmarks
The bookmark icon ![]() located at the top right of the report viewer Parameters pane, can be used to save multiple sets of filtering values.
located at the top right of the report viewer Parameters pane, can be used to save multiple sets of filtering values.
This option can be used by both Designers (in View Report mode) and Viewers.
|
Note Dependent filters work in bookmarks the same way they do when viewing and generating the report or view. |
The saved set of values can be used privately, or shared with other users of the report by making it Public  . All report users can access the Public bookmarks. When a bookmark is selected, the predefined set of values is copied to the filtering variables.
Using an existing bookmark:
- Click the Bookmarks dropdown list from the Bookmarks menu.
- Choose one of the available bookmarks. The bookmarked values set is copied to the variables of the report Filters. You can use the search bar to facilitate your search.
- Once you've clicked the needed bookmark, click Submit in the Parameters pane to apply the filtering values.
Creating a new bookmark:
- Enter the desired set of variable values in the Parameters pane.
- Click New bookmark in the Bookmarks menu.
- Enter a name for the new bookmark.
- Check Make bookmark public if you want to share it with other Designers and Viewers or leave it blank to keep it private.
- Confirm by clicking Save.
|
Note The owner of a bookmark is the user who created it. This user can delete the bookmark at any time. Deleting the bookmark also makes the bookmark unavailable for other users if it is shared. |
Deleting an existing bookmark:
- Click the Bookmarks dropdown list in the Bookmarks menu.
- Locate the bookmark you want to delete. You must be the owner of this bookmark to delete it.
- Hover over the filter and click Delete
 .
.
|
Caution When deleting a bookmark, there is no confirmation dialog. A deleted bookmark cannot be restored. |