Edit a prompt
- On the Manage Prompts page, on the Prompts tab, in the prompt's row, under Actions, click
 and then click
  Edit.
Edit. - The Edit [prompt name] dialog appears.
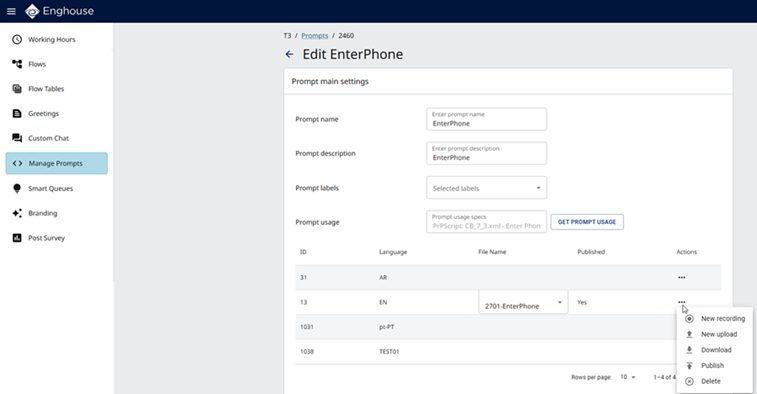
From here, you can:
- Rename the prompt and change the description, by clicking in the Prompt name box or Prompt description box.
- Label the prompt, by selecting a label in the Prompt labels list.
- Get prompt usage, by clicking the Get Prompt Usage button.
- Add a new recording
- Upload an audio file
- Download an audio file
- Publish an audio file
- Delete an audio file
Add a new recording
- In the language's row, under Actions, click and then click
 New recording. The Recording For dialog appears.
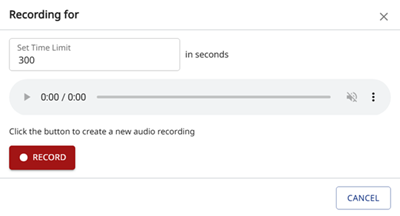
- In Set Time Limit, enter the time in seconds.
- To start the recording, click
 . Recording in progress ... appears.
 - To pause and resume the recording, click Pause and Resume.
- To stop the recording, click Stop. Recording complete appears.
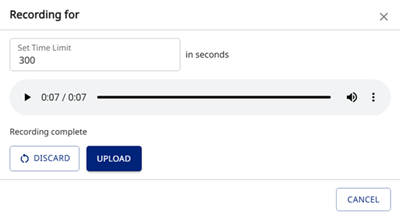
- To play the recording, click
 Play.
Play. - To download the recording, click
 More options and then click
  Download. The .wav file appears in your Downloads folder.
 - To change the playback speed, click More options and then click
 Playback speed. Select the speed in the list.
 - To upload the file, click Upload. The audio file appears in the File Name list.
Text to Speech
|
Note Text to Speech (TTS) functionality is optional. Refer to the Provisioning Portal Deployment Guide and the TTS-specific deployment. TTS utilizes different AI cloud vendors (supported by Enghouse - Microsoft, IBM and Google) each having their own charges. |
- If Text to Speech is installed and enabled for your tenant and language, the Recording For dialog appears as follows.
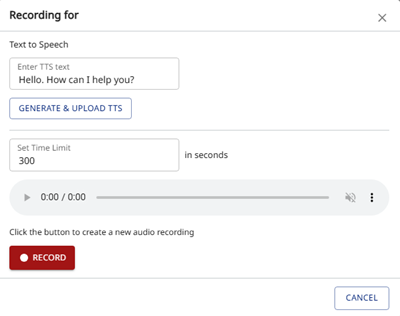
- In Enter TTS text, enter the text for the prompt.
- Click Generate & Upload TTS to generate the text as an audio file and upload it to the server.
Upload an audio file
|
Note You can upload multiple audio files per language per prompt. |
- In the language's row, under Actions, click and then click
 New upload. The file selection dialog appears.
 - Select the audio file and click Open. The audio File Name list is updated.
|
Note
<add key="PublishPromptFolder" |
Download an audio file
- In the language's row:
- Under File Name, select the file.
- Under Actions, click and then click
 Download.
- The wave file appears in your Downloads folder.
- Use any audio player that supports wave audio file format to play back the audio file.
Publish an audio file
|
Caution Publish does not prompt for confirmation. It immediately brings an audio file from the system repository online. |
- In the language's row:
- Under File Name, select the file.
- Under Actions, click and then click
 Publish.
- In the Published column, the status changes to Yes.
Delete an audio file
- In the language's row:
- Under File Name, select the file.
- Under Actions, click and then click
 Delete.
- In the Delete Prompt dialog, click Delete.