Variables
Variables are used as data containers for values that are subject to change over time, depending on calculations, user input or other factors. They are often used in database queries and report rendering setups (filtering, grouping, etc.).
The Reporting Dictionary provides two general categories of data containers for values:
- Variables: custom variable data containers that can be configured for specific report needs.
- System Variables: a predefined set of variables with some of the typical parameters required for report generation, provided by Reporting.
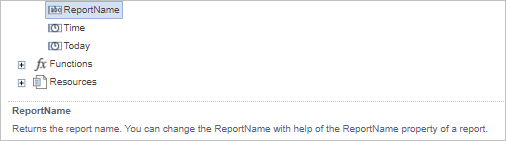
System variables
The System Variables category in the data model editor Dictionary is populated with predefined variables that are typically used for standard report generation. More information on each of the system variables is provided in Reporting. Click on a variable to see an explanation of its function in the bottom part of the screen.
Custom variables
There are a number of variables in Reporting that were designed specifically for use in data models and assets, such as reports. These variables should not be edited and are used as placeholders when designing. Additionally, custom variables and their values can be added and defined as needed for each data model and/or asset.
_reportViewer variables
Variables starting with _reportViewer in the data model editor Dictionary are used for viewer identification. They are automatically generated, and are not visible in the report designer. They can be used for security data filtering on the data model level (such as in database queries), or for read purposes, such as, for example, to always show the report viewer's username in a report. They should not be edited as they are automatically populated from the database when a report is opened/rendered.

Other Reporting variables
In addition to the _reportViewer variables, the following Reporting-specific variables can be seen in the data model or report editor:
- _viewHiddenVars: Used in report views to stop parameters hidden from viewers from appearing in the filters and settings sumup section of a generated report view.
- databaseType: Used to detect the type of database used in a data source for various purposes, such as custom functions, as described within the Reporting web app.
- _reportTarget: Used to specify the delivery format for an asset, indicating whether the target is SUBSCRIPTION or WEB_UI.
- _reportType: Used to indicate which type of element (DATASOURCE, REPORT, REPORT_VIEW, or DASHBOARD) is represented in the data model or assets.
- _assetUuid: A globally unique identifier (UUID) used to reference a specific asset in the system.
- _datasourceUuid: A globally unique identifier (UUID) used to reference a specific data source in the system.
Same as the _reportViewer variables, these are not intended to be edited or modified in any way, nor usually explicitly used in data sources or assets, and are instead only placeholders needed for the proper functioning of Reporting.
Custom variables
Two distinct modes of variable functioning are available in Reporting:
- Autonomous: not dependent on user input. To create an autonomous variable, leave the Request from User check box further in the steps unchecked.
- User-controlled: directly related to user input. To create a user-controlled variable, check the Request from User check box further in the steps. There are two variations of this variable:
- selecting preset values, such as from a dropdown menu of predefined options.
- free input of values, such as entering values into a field.
To create a new custom variable, follow these steps:
- Click New Item in the Dictionary toolbar OR right-click the Variables category in the Dictionary.
- Click New Variable.
- The New Variable pop-up window for variable configuration opens. Enter the following configuration parameters:
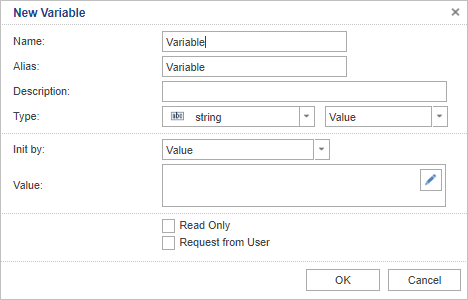
- Name: the variable reference used in the system. It should not contain special characters or spaces (underscores "_" can be used).
- Alias: label displayed to the user (if the variable has the Request from User check box checked).
|
Note If this label is used for variable reference, it should be placed in square brackets [Alias]. By default, Alias is copied from the Name parameter, and it is recommended to keep it similar (identical, if possible) to Name. |
- Description: used to document the purpose of the relevant variable.
- Type: is defined by two parameters:
- the type of data of the variable value, such as string, timespan, integer, image or others.
- the nature of the variable (Value, Nullable Value, Range or List).
|
Note
|

- Init by: sets the initial value (before report rendering) for the variable, with two options available in the dropdown menu:
- Value: explicitly declared in the following parameter field.
- Expression: built using different functions and other objects from the Dictionary, and can vary from rendering to rendering.
- Value/Expression: used to input the value or expression (depending on the choice for the Init by field) for the initial variable value.
- Read Only: if this check box is checked, the value of the variable is locked and cannot be edited by other users in the report rendering process.
- Request from User: if checked, the user is required to input and submit a value for the variable prior to report rendering. This makes the variable user-controlled. This option is unavailable if Read Only is checked.
|
Note Checking the Request from User check box opens another part of the window with further fields. A detailed overview of Request from User options is available in Request from User (RfU) variables. |
- Once all the relevant data is entered into corresponding fields, click OK to finish the variable creation process.
Request from User (RfU) variables
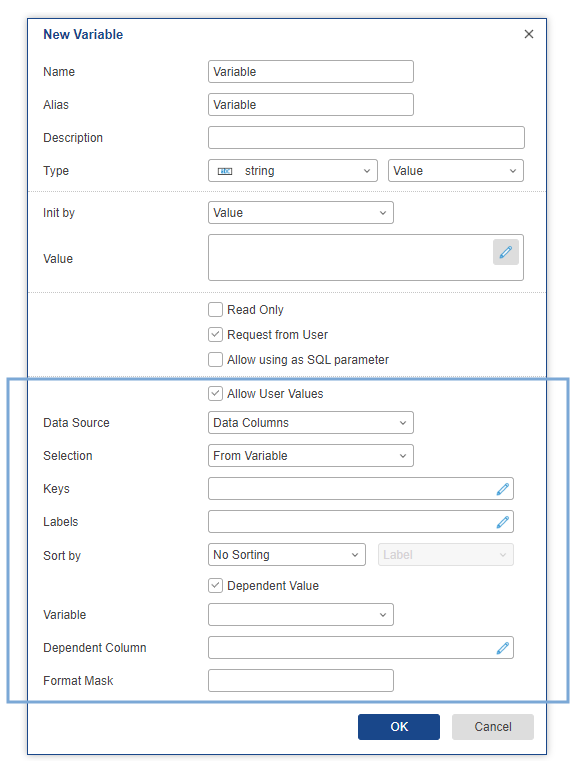
All Request from User (RfU) variables are user-controlled. When this option is selected upon variable creation, the New Variable window expands with new options for variable configuration.
In order to successfully set up such a variable, you must enter the following information:
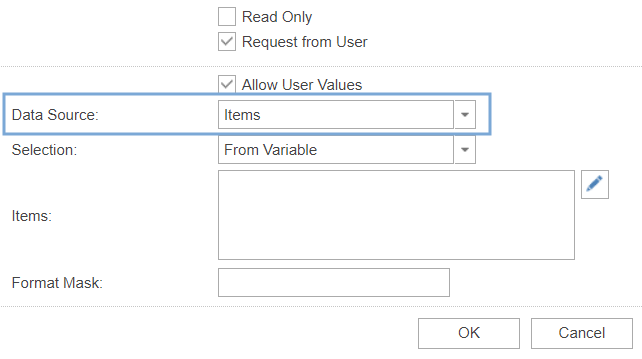
- Allow User Values: Lets users freely input values when prompted during report creation. This option can be used in combination with preset value lists or by itself.
- Data Source: Defines the type of the preset list of values that are offered for user selection. These options are available in the dropdown menu:
- Items: The preset values are defined explicitly by the data designer in the Items list. For more details for the needed data, see Select from a custom list of items.
- Data Columns: Uses data source columns as a list of presets. This is used if you want to directly use content provided by the data source. For more details for the setup process, see Select from data columns.
- Selection: allows the option to define an initial value. The user can leave it as is or enter a different value. The following options are available from the dropdown menu:
- From Variable: Sets the chosen Init by option as the one initially displayed.
- First: leaves the variable value field empty and sets the first value of the preset data source (which can be an Item or Data column) as the initially displayed value.
- Format Mask:provides an option for defining a format in which the items will be displayed to the user, and is dependent on the variable data type. In the case of Datetime, for instance, you can select between displaying both the date and time, only date or only time.
Additional options available in this dialog depend on the chosen Data Source. For options available when choosing the Items option as Data Source, see Select from a custom list of items. For the options used when Data Columns is selected, see Select from data columns.
|
Note In full report viewer, all the Request from User (RfU) variables are required by default, and the report will not render unless the variable values are submitted first. This is not the case in report preview mode. However, the variables, with the exception of Datetime Range, can be made optional. For details on making variables optional see Making RfU list selection variables optional. |
Select from a custom list of items
Follow these instructions if you are creating a new user-controlled variable and you have selected Items in the Data Source dropdown menu in the New Variable window. If you have selected Data Columns, see Select from data columns.
The Items editing menu is accessed by clicking the Items field on the New Variable menu, or by clicking the pencil icon  next to the Items field. This opens a new window.
The toolbar provides several options for item configuration:
-
 New Value: used to add a new value item to the list.
 -
 New Expression: used to define a new list item by using an expression.
 -
 Select Columns: used to specify data source columns to be used as Keys and Values.
|
Note It is not recommended to use Items as a data source selection if you need to modify columns, unless the existing data source list (from a column) needs to be edited (expanded or shortened). Using an edited existing data column facilitates completing the list by copying the column contents. When the data columns are selected, their contents are added to the list as single entries, which can then be edited. If complete columns need to be used, with no additional editing, it's better to use the Data Columns selection as the data source. See Select from data columns. |
-
 Delete: deleting an existing list item.
 -
 Up/Down: used to change the order of items in the list.
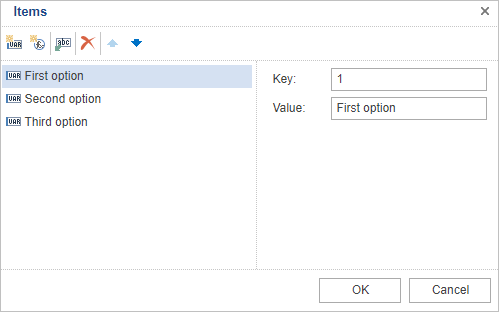
On the right side of the Items window are the input fields used to define values of the list items:
- Key: actual value of the selected item, used in the background for data manipulation.
- Value: GUI representation of the item. This is what the user sees and selects.
|
Note An example for setting different Keys and Values is using a table with city names and a unique numerical ID for each city, among other data categories. Users usually prefer selecting the city name from a dropdown list with full names, and not a numerical ID assigned to the city. However, in the report background calculations, it may be easier to work with a city's numerical ID, as opposed to its full name. In such a case, Values would be set to the city names, and Keys would be set to unique numerical IDs for each of the cities in the list. The Keys and Values don't have to differ, they can be identical. In that case, the same content can be entered into both fields or Values can be left empty. |
After entering all the relevant information in the required fields, click OK to continue.
Select from data columns
Follow these instructions if you are creating a new user-controlled variable and you have selected Data Columns in the Data Source dropdown menu in the New Variable window. If you have selected Items, see Select from a custom list of items.
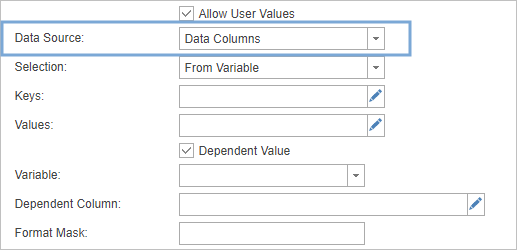
Enter relevant data in Keys and Values:
- Keys: Actual values of the selection, used in the background for data manipulation.
- Values: GUI representation of the selections - what the user sees and selects.
|
Note An example for setting different Keys and Values is using a table with city names and a unique numerical ID for each city, among other data categories. Users usually prefer selecting the city name from a dropdown list with full names, and not a numerical ID assigned to the city. However, in the report background calculations, it may be easier to work with a city's numerical ID, as opposed to its full name. In such a case, Values would be set to the city names, and Keys would be set to unique numerical IDs for each of the cities in the list. The Keys and Values don't have to differ- they can be identical. In that case the same content can be entered into both fields or Values can be left empty. |
To modify Keys or Values, click the respective field or pencil icon next to the field you want to edit. This opens a new window:
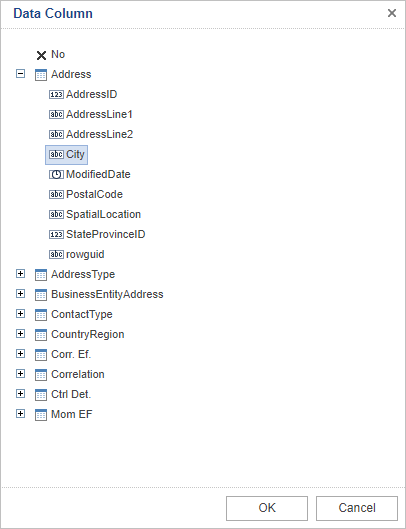
Here you can locate the column (in its respective table) to be used as the Keys and/or Values data in a variable. Click  to remove the current column selection or click OK to continue.
If Value is selected in the Type dropdown menu in the upper half of the New Variable window, enter the following additional data as well:
- Dependent Value: Select this checkbox to filter the provided column-related selection content, depending on a separate Variable value.
- Variable: Reference to the variable used for selection filtering. Can be entered if the Dependent Value check box is checked.
- Dependent Column: Column of the data source related to the filtering variable. Can be entered if the Dependent Value check box is checked.
After entering all the relevant information in the required fields, click OK to continue.
When using dependent variables, make sure to also include a condition in the query that corresponds with this. Below is an example of how dependent values can be used.
|
Caution When using Dependent Values, the dependency needs to be defined both in the variable window AND in the query. Otherwise, the dependency will not work properly. |
Dependent value example
Let's assume there are a number of contact centers (sites) across a variety of companies in your data set. Both of these can be used as filters in reports and they can both show all the available companies and sites in their respective dropdown lists, which you can then select as needed and use to filter data by in your report.
For number of reasons, such as facilitating viewing, you may want to create a dependent value, which will function in such a way that when you select a value in the Company filter, only the Contact Center values related to it will be shown in its filter dropdown menu, and only those values can be used as filters in the report.
This can be done by making the site a dependent value, that is, it becomes dependent on the Company variable (in this case):

After adding this option in the Contact Center variable (which is used as a filter in the report), a condition along the lines of the following also needs to be added to the query to ensure that the query, report and dependency functionality all work properly:
SELECT
    DM.site AS "site", <.... rest of the query ...>
WHERE {varCompany.Count == 0 ? "": "AND company IN (" + varCompany.ToQueryString("'") + ")"}
In this case, the WHERE condition ensures that if there is nothing selected for the company filter (varCompany), all contact centers (site) will be included in the report; if something is selected for the company filter (varCompany.Count is not 0), a condition is added to load only those sites that belong to the company or companies selected for the varCompany filter. That way, only the sites related to the selected companies are shown.
Once all these steps are completed and saved, the Contact Center filter becomes dependent on the Company filter, so that if one or multiple Company values are selected, only those Contact Center values related to the selected Company values will be shown in the Contact Center filter dropdown list.