Speech Enabled Menu

This block is only available if Integrated Speech IVR is enabled.
This block is similar to the Menu block with the addition of Text to Speech (TTS) and Automated Speech Recognition (ASR) speech capability. It is also an extension of the Speech Play and Collect block.
|
Properties |
Values |
Description |
|---|---|---|
|
Menu Prompt |
String |
The sound file to play for menu options. Enter a .wav file, plain text, or Speech Synthesis Markup Language (SSML) string. For a .wav file, do one of the following:
|
|
Invalid Prompt |
String |
The sound file to play for an invalid choice. See the Menu Prompt description. |
|
No Entry Prompt |
String |
The sound file to play if the caller does not enter anything within Max Time (for speech response). See the Menu Prompt description. |
|
Stop Prompt On |
Start of Input, Recognition
Complete, or |
This property determines if caller barge-in is enabled or disabled:
|
|
Confidence Level (optional) |
Percent |
This is a confidence threshold parameter. The speech recognizer computes a confidence level. If the level is below the threshold you set, the recognizer returns no-match as the recognition result. If the level is at or above the threshold, then recognition is successful. The default is 50. |
|
Speech Rate |
Slow, Medium, or Fast |
The rate a TTS message is read. |
|
Volume |
Soft, Medium, or Loud |
The volume level a TTS message is read. |
|
Termination Digits |
0-9 # and *
|
Enter digit(s), # or * . These value(s) can be used by the caller to terminate this command. When a termination digit is pressed, playback stops, and the script executes the next block. |
|
Clear Digits |
Yes or No |
Clear the digit buffer of any digits entered before playing the audio file. The default is No. |
|
Max Time |
Seconds
|
Maximum waiting time. The length of time the script waits for caller response after the prompt completes. The default is 20 and the maximum permitted value is 30. This property applies only to Automatic Speech Recognition (ASR). |
|
Max Silence |
Seconds |
The maximum length of time to wait for the caller's next response. The default is 5. |
|
Max Tries |
Integer |
Maximum number of times the caller can respond to a prompt. The default is 1. |
|
Result Variable |
String |
Name of a variable into which the digit string is to be passed. Must start with an alphabetic character and not exceed 255 characters in length. There is no default value for this, so leaving this field blank causes this block not to function properly. See How to use variables. |
|
Input Mode |
Speech and DTMF, |
If you select Speech and DTMF, and if the caller presses a key (DTMF), the system ignores anything the caller says after the key press. If you select Speech and DTMF, and if the caller speaks, the system ignores any key press after anything the caller says. The default is Speech and DTMF. |
|
Close MRCP Session |
Yes or No |
Close the MRCP session after leaving the MRCP block. |
|
Comment |
Text |
Optional description of this block in your script. |
Configure the Speech Enabled Menu block
- Right-click the block and click Add case. The Speech Enabled Menu dialog appears.
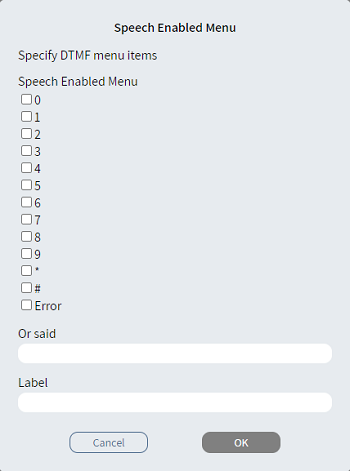
- Perform one or both of these steps:
- From the Speech Enabled Menu list, select one or more menu items.
- In Or said, type the text for matching the caller's spoken response. You can type up to 15 separate words. Separate the words with semicolons (";").
|
Note
|
- Optionally, in Label, type an alternative description.
- Click OK. The Case branch
 appears.
 - Connect the Case branch to the appropriate block in the script.
- Repeat steps 1-5 to add the branches you need.
- Connect the Else
branch
 to the appropriate
block in the script.
to the appropriate
block in the script.